Import Responses via Automation
Overview
The Import Responses via Automation feature in SurveySensum
allows you to automatically pull survey response data from external storage
servers into your surveys on a scheduled basis. Instead of manually uploading
response files each time, you can configure a recurring automation that fetches
the latest files, maps the columns to your survey questions, and imports the
responses seamlessly — saving time and eliminating the risk of manual errors.
This feature is especially useful when:
• You have existing response data stored in an SFTP
server or Azure that needs to be reflected in your SurveySensum.
• You want to keep your survey data continuously updated
without manual intervention.
• You need to consolidate response data from external
systems into a single survey project on a recurring schedule.
Supported Import Sources: SFTP (Secure File Transfer
Protocol) and Azure
How to Access Import Responses via Automation
- Step 1: From the top navigation bar, click on Automation.
- Step 2: On the Automation listing page, click Create
Automation in the top-right corner.
- Step 3: On the Create Automation screen, three
automation types will be displayed. Select Scheduled and click Schedule
Now.
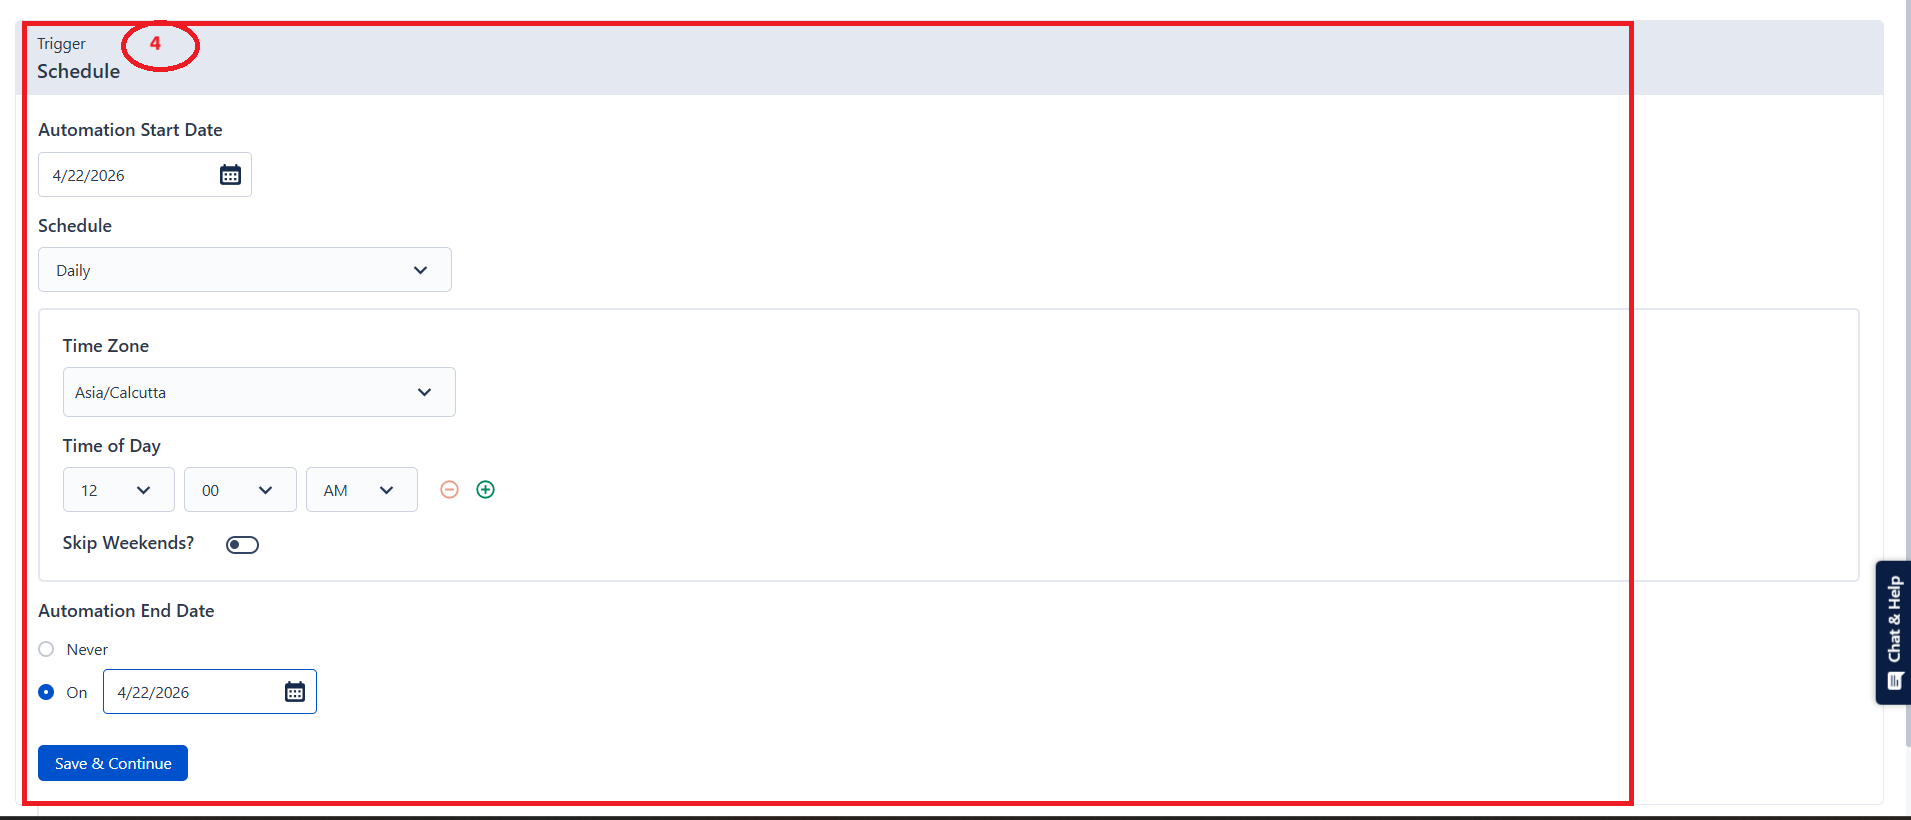
- Step 4: Configure the Schedule Trigger.
Fill in the following details on the Schedule configuration panel:
- Automation Start Date: Select the date from
which the automation should begin running. Click the calendar icon to pick a
start date.
- Schedule: Choose how frequently the
automation should run. The available frequency options are:
- Daily
- Weekly
- Monthly
- Quarterly
- Half Yearly
- Annually
- Time Zone: Select the appropriate time zone
for the schedule. By default, it is set to Asia/Calcutta.
- Time of Day: Set the exact time (hour,
minute, and AM/PM) at which the automation should run. You can add multiple
time slots using the (+) icon beside the time field.
- Skip Weekends: Toggle this option ON if you
want the automation to skip running on Saturdays and Sundays.
- Automation End Date: Choose when the
automation should stop:
- Select Never if you want the automation to run
indefinitely.
- Select On and pick a specific date if you want the automation to stop
after a certain date

Use the Automation End Date option when you are
importing a batch of historical response files within a defined time window.
Setting an end date ensures the automation stops automatically once all files
have been imported, preventing unnecessary runs
 5. Step 5: The Add Action panel will open on the right side. Scroll down to the Import Responses section and select Import Responses. This action allows you to import responses for existing surveys from your connected storage server.
Configure Your Import Action
After selecting the Import Responses action, you will
configure it in four sequential steps. The steps are structured the same for
both SFTP and Azure Storage — only the connection credentials in Step 2 differ.
Follow the appropriate path based on your storage provider.
Import via SFTP
Step 1: Select Survey
From the Select a survey dropdown, choose the survey into which
you want to import the responses. Only existing surveys in your account will be
listed then Click Save & Continue to proceed.
Step 2: Connect to Import Source – SFTP
From the Select Location dropdown, select SFTP.
Enter the following SFTP server credentials:
• Host: Enter the IP address or hostname of your
SFTP server (e.g., 18.212.28.32).
• Port: Enter the port number. The default SFTP
port is 22.
• Username: Enter the SFTP username configured to
authenticate into the server.
• Authentication Type: Select the authentication method to connect to your SFTP server. Two options are available:
- Basic (Password): Select Basic from the dropdown and enter the password associated with your SFTP username in the field provided.
- SSH: Select SSH from the dropdown and then choose an SSH key from the Select SSH Key dropdown. If no SSH key has been added yet, click Create SSH Key to generate and configure one before proceeding.

Your credentials are encrypted and stored
securely. SurveySensum does not expose them in plain text at any point

Once all credentials are entered, click Test Connection to verify that SurveySensum can successfully connect to your SFTP server. A
confirmation Toast will appear if the connection is successful.
Step 3: Import File
Configure the file-level settings so the automation knows
which files to pick up from your SFTP server:
- Specify the folder path of your files: Enter the
full directory path on the SFTP server where the response CSV files are located
(e.g., /uploads/Pratik/ResponseImport).
- Specify the file name you wish to import (.csv
format only): Define the file name matching rule using the File Name condition:Use Starts with and enter the prefix of the file name
(e.g., NPS 1 L).
- Any file in the specified folder whose name begins with this
value will be imported.
- What do you want to do with the synced file? After
the file has been successfully imported, choose what happens to it on the SFTP
server:
- Delete the file from SFTP Server: The file is
permanently deleted from the server once imported.
- Move to another folder: The file is moved to a
different directory path on the SFTP server. Enter the destination folder path
in the Enter the folder path where you want to move the synced file field (e.g., /uploads/Pratik).
- Is file encrypted?: If your file is
PGP-encrypted, check this box and provide the decryption key to allow
SurveySensum to decrypt the file before importing.
- Click Save and Continue.
File Encrypted
If your response file is encrypted, check the Is file encrypted? box. Two additional fields will appear:
- Select Encrypted File Extension: Choose the encryption format of your file. The supported formats are enc and pgp.
- Select PGP Key: Select the PGP key to be used for decrypting the file before import. The keys available in this dropdown are the ones already configured in your account settings.
Step 4: Map Responses from File
SurveySensum will read the sample file from your SFTP server
and display the column headers along with a preview of the data. Map each
column header from your uploaded file to the corresponding survey question or
response property in SurveySensum.

Before you can map responses from your file, you must have a template file already present in your SFTP server. The system reads the column headers from this template file to identify and match the response fields during mapping.
The mapping table contains four columns:
- Mapped Status: Indicates the mapping result for
each column.
- Auto Mapped (green checkmark) means SurveySensum matched it
automatically.
- No data (orange icon) means the column was found but no
data preview is available.
- Column Header From Uploaded File: The column
name exactly as it appears in your CSV file.
- Preview Content Information: A sample of actual
values from that column to help you verify the mapping.
- SurveySensum Header: Two dropdowns — first
select the mapping type (Question or Response property), and then
select the specific question or property it maps to.
- Once all column mappings are verified and set correctly, click Save to finalize the SFTP Import Responses action.
Import via Azure Storage
Step 1: Select Survey
From the Select a survey dropdown, choose the survey
into which you want to import the responses. Only existing surveys in your
account will be listed. Click Save & Continue to proceed.
Step 2: Connect to Import Source – Azure Storage
From the Select Location dropdown, select Azure
Storage.
Enter the following Azure Blob Storage credentials:
- Storage Account Name: Enter the name of your
Azure Storage account (e.g., ssuplodapowerbi).
- Container Name: Enter the name of the container
within your storage account where the response files are stored (e.g.,
CarService_Responses).
- SAS Token: Enter the Shared Access Signature
(SAS) token that authorizes SurveySensum to access your Azure Storage
container.
Your credentials are encrypted and stored
securely. SurveySensum does not expose them in plain text at any point.
Once all credentials are entered, click Test Connection to verify that SurveySensum can successfully connect to your Azure Storage
container.
Step 3: Import File
Configure the file-level settings so the automation knows
which files to pick up from your Azure container:
- Specify the folder path of your files: Enter the
folder path within your Azure container where the response CSV files are
located (e.g., uploads/Responses).
- Specify the file name you wish to import (.csv
format only): Define the file name matching rule using the File Name condition:
- Use Starts with and enter the prefix of the file name
(e.g., Car_Service_Feedback). Any file in the specified folder whose name
begins with this value will be imported.
- You can also click Download Sample File to view
and download the expected CSV format as a reference before running the
automation.
- What do you want to do with the synced file? After
the file has been successfully imported, choose what happens to it in Azure
Storage:
- Do nothing: The file remains in its original
location in the container after import.
- Delete the file from Azure Storage Server: The
file is permanently deleted from the container once imported.
- Move to another folder: The file is moved to a
different folder within the same container. Enter the destination path in the
- Enter
the folder path where you want to move the synced file field (e.g.,
uploads/Export_Responses).
- Click Save and Continue.
File Encrypted
If your response file is encrypted, check the Is file encrypted? box. Two additional fields will appear:
- Select Encrypted File Extension: Choose the encryption format of your file. The supported formats are enc and pgp.
- Select PGP Key: Select the PGP key to be used for decrypting the file before import. The keys available in this dropdown are the ones already configured in your account settings.
Step 4: Map Responses from File
SurveySensum will read the sample file from your Azure
container and display the column headers along with a preview of the data. Map
each column header from your uploaded file to the corresponding survey question
or response property in SurveySensum.
Before you can map responses from your file, you must have a template file already present in your Azure server. The system reads the column headers from this template file to identify and match the response fields during mapping.
The mapping table contains four columns:
- Mapped Status: Indicates the mapping result for
each column.
- Auto Mapped (green checkmark) means SurveySensum matched it
automatically.
- No data (orange icon) means the column was found but no
data preview is available.
- Column Header From Uploaded File: The column
name exactly as it appears in your CSV file.
- Preview Content Information: A sample of actual values from that column to help you verify the mapping.
- SurveySensum Header: Two dropdowns — first
select the mapping type (Question or Response property), and then
select the specific question or property it maps to.
- Once all column mappings are verified and set correctly, click Save to finalize the Azure Storage Import Responses action.
Related Articles
Contact Export & Import Automation
What is automation by Survey Share? It allows you to automatically trigger actions (like sending emails, creating tickets, assigning tasks, etc.) whenever someone submits a survey via a shared link without needing to manually check responses. It ...Export Responses Automation
What is automation by Survey Share? It allows you to automatically trigger actions (like sending emails, creating tickets, assigning tasks, etc.) whenever someone submits a survey via a shared link without needing to manually check responses. It ...Export Unique Link Via Automation
Introduction The Export Unique Links action allows you to automatically generate and export personalized survey links for each contact in your contact list. Each link is unique to the respondent, ensuring individual tracking and response ...Event-Based Automation
Introduction Event-based automation is a smart way to trigger actions immediately after a specific event occurs, such as when someone submits a survey or provides a certain response. It enables you to respond in real-time by automatically sending ...How to create tickets using Automation?
Creating Tickets Using Automation Creating tickets using Automation allows you to automatically generate support tickets whenever specific survey responses meet defined conditions. This ensures that critical feedback is instantly routed to the right ...